DIY Macrame Tote Bag Tutorial for Market Day Style
There is a moment at every market stall where the thin plastic bag gives up, and it usually happens over the eggs. This macrame tote bag tutorial builds you the bag that never does that: a strong cotton net tote with wooden handles, knotted by your own hands in one weekend.
In my experience, beginners do not fail at the knots; they fail at the measuring, when cords run out two rows from the end. So this guide gives you every length up front, teaches the three knots before the bag starts, and walks you through the band, the net, the join, and the base in order.
What Makes This Tote Strong Enough for Market Day

A tote is only as strong as the path its weight travels. In this bag, the load hangs from two wooden rings, passes into a tightly knotted band, and spreads across dozens of net cords instead of a few weak points. That spread is the whole secret.
Store bought net bags often fail at stitched seams, where thread cuts into fabric under a heavy load. Knots behave differently. Each square knot locks tighter when pulled, and the cotton cord itself stretches just a little, absorbing the swing of a full bag instead of tearing.
Pick Your Handles First: Wooden Rings or Knotted Cord
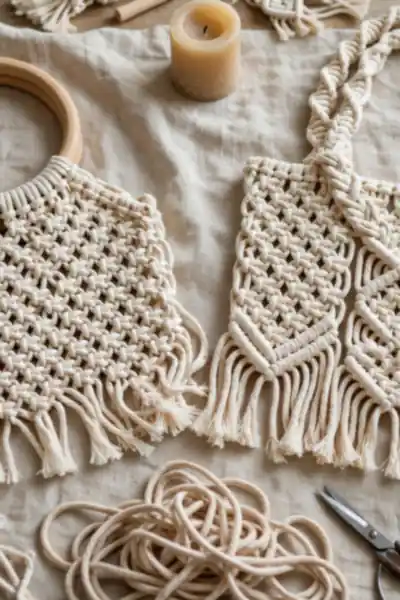
Everything else in this tutorial stays the same either way, so this is a choice about feel, not difficulty. Wooden rings give the classic market look and a firm grip. Knotted cord handles cost nothing and sit softer on a shoulder. Decide now, because the first cut depends on it.
- Choose wooden rings if you want the bag to hold its open shape at the stall and hang neatly at home. A 5 inch ring fits a hand comfortably and suits this pattern exactly.
- Choose knotted handles if you prefer a soft shoulder carry or want to spend nothing beyond the cord itself. The handles are built later from the bag’s own cords.
- Think about the load you carry most. Rings spread weight across your fingers for short heavy trips, while cord handles feel better on longer walks.
- The rest of this guide follows the wooden ring build, since it is the firmer teacher for a first bag. Short notes mark the places where the knotted version differs.
Also View:DIY Macrame Cat Hammock Your Cat Will Actually Use
Every Supply With the Exact Cord Length and Quantity

What You Need:
- 4 mm cotton macrame cord, 384 feet in total. Cut as 32 cords of 12 feet each, and one large spool keeps the color and thickness even.
- Two wooden rings, 5 inches across. Beech or bamboo both work; check the surface is smooth so it never snags the cord.
- Sharp fabric scissors. Cord this thick blunts kitchen scissors fast, and clean cuts keep the ends from fraying while you knot.
- A tape measure and painter’s tape. Measuring every cut matters, and a strip of tape on each end stops the cord from unraveling.
- A door hook, S hook, or clipboard. The work hangs from it at a comfortable height so both hands stay free for knotting.
- One drawstring pouch or small fabric liner. Optional for today, but it is the fix that keeps keys and coins inside the net later.
The whole list usually costs less than one store bought tote of the same quality, and most of it is probably in your craft drawer already. Buy the cord as one spool rather than small balls, because changing thickness halfway through a net body shows in every single row.
Learn the Three Knots Before You Touch the Bag
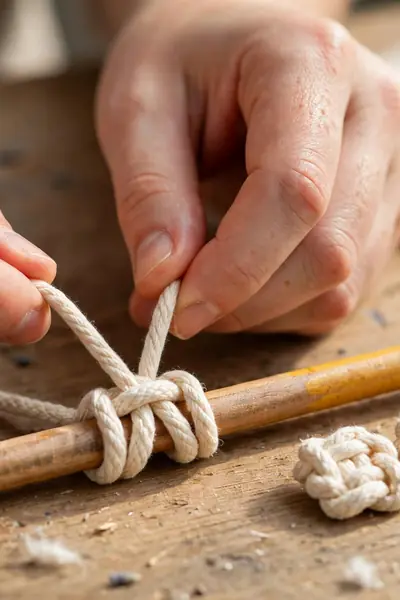
Common Mistake: Most beginners learn the knots directly on the bag itself. Every wobbly first attempt then lives in the top rows where it shows most, and unpicking tight cotton knots frays the cord ends until the whole panel looks tired before it is even finished.
The Fix: Cut one spare cord and spend fifteen minutes on a pencil or spare ring first. Learn the lark’s head mount, then tie ten square knots in a row, then one alternating row, until your hands repeat the moves without your eyes checking every pass.
One warning saves hours later: a square knot is two halves worked from opposite sides. If you start both halves from the same side, the knot twists into a spiral and your rows lean. On the practice cord that spiral is a free lesson; on the bag it is a slow unpicking.
Cut and Mount the Cords on the Handles
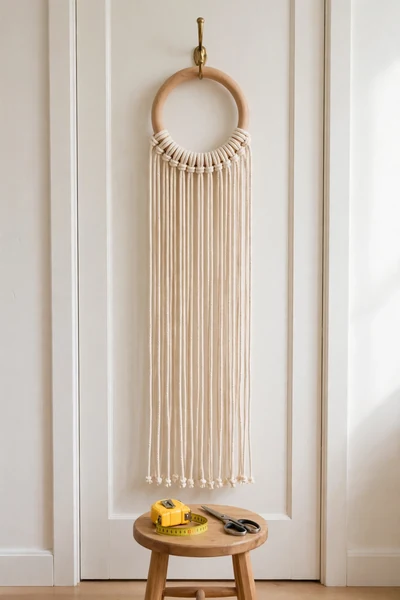
This is the only measuring heavy stage of the whole bag, and it decides whether the two panels match at the end. Work slowly here and the knotting that follows becomes almost mindless. Hang one ring from your hook before the first cord goes on.
- Measure and cut 32 cords of 12 feet each, laying them in a neat pile as you go. Tape both ends of every cord the moment it is cut.
- Fold the first cord in half and lay the loop under the ring. Pull the two ends down through the loop and snug it tight: that is the lark’s head mount from your practice.
- Mount 16 cords on the first ring, sliding them close together at the center of the ring’s lower curve. Count the hanging ends: you should have 32.
- Repeat on the second ring with the other 16 cords. Set this panel aside, hanging, so the cords stay untangled and in order.
- Comb each panel gently with your fingers and check both hold the same number of cords. A two minute count now prevents a lopsided bag later.
Knotted handle makers: mount your cords on a sturdy dowel or broom handle laid across two chairs instead, and keep the same counts.
Knot the Firm Top Band That Holds the Shape
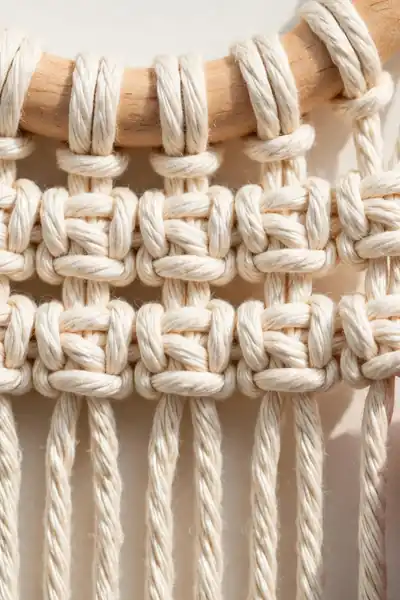
Before: Straight under the rings, the mounted cords are just loose strands. Hang anything in a bag built right onto the net and the top pulls into uneven points, the mouth gapes wider every week, and the handles feel like they are carrying the whole load alone.
After: Two tight rows of square knots change the whole structure. Work in groups of four cords, eight knots per row, pulling each one snug, then a second row directly beneath it. The band becomes a firm frame that holds the bag’s width and shares the weight evenly.
Do the same two rows on the second panel before going further, and hold the panels side by side to compare. In my experience, bands that match at this stage almost guarantee panels that join cleanly at the sides later, with no mystery extra length on one side.
Build the Net Body With Alternating Square Knots

Do This:
- Leave a 1 inch gap below the band before the first net row, and use a ruler or two fingers to set every gap the same way.
- Work the first net row in offset groups: set the first 2 cords aside, then knot groups of 4 across, leaving the last 2 cords free.
- Alternate each row, one row starting at the edge and the next starting 2 cords in, so the knots lock into a diamond net.
- Count rows as you go and stop both panels at nine net rows, so the bodies match in length before joining.
Avoid This:
- Do not pull every knot as tight as it will go, because the net needs even, relaxed tension or the panel curls inward.
- Do not guess the gaps by eye alone after the first rows, since small drifts grow into a visibly slanted net.
- Do not knot while the panel lies flat on a table, because gravity helps your tension only when the work hangs.
- Do not rush the last rows as the cords get shorter, since that is exactly where uneven lengths begin.
By the third row the pattern reads itself: diamonds open evenly, edges stay straight, and your hands settle into a rhythm. Hold the panel up after every few rows and look at the whole shape, not single knots. Small corrections made early stay invisible; late ones never do.
Join the Two Panels Into One Bag
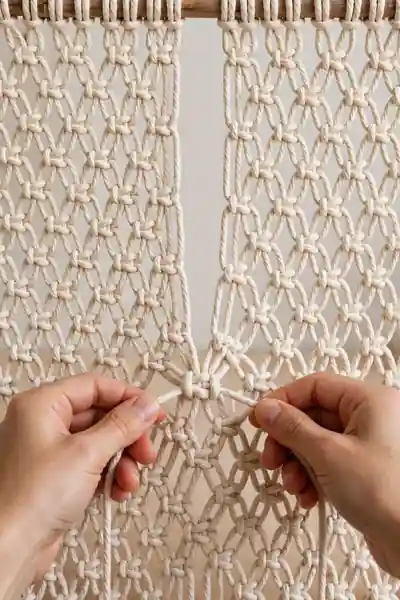
Here the two flat panels become a bag, and the join is simpler than it looks. The side seams use the edge cords themselves, so no sewing and no extra cord appear anywhere. Work with both panels hanging side by side at the same height.
- Hang both panels next to each other, bands at the same height, net rows matching. Bring the outer 2 cords of each panel together at the left edge.
- Take the 2 edge cords from the front panel and the 2 from the back panel as one group of 4, and tie a square knot at the height of the first net row.
- Repeat down the whole left side, one joining knot beside each net row, keeping the same 1 inch spacing so the seam blends into the pattern.
- Do the same down the right side. When both sides are joined, the piece hangs as an open tube with two handles on top.
- Slip a hand inside and gently stretch the seams. Any gap that opens wider than the net diamonds needs one extra knot at that row before you continue.
Close the Base and Finish the Bottom Edge

With the sides joined, turn the bag so the bottom opening faces you and lay the work flat on a table. Pair the hanging cords front to back, then work across them in groups of four, tying one tight row of square knots with no gaps at all.
Add a second tight row directly under the first, pulling every knot firmly so the base holds its line under weight. Then choose the finish: trim the tails evenly at 2 inches for a clean modern edge, or leave 3 inches and comb them out for a soft fringe.
Add an Inner Pouch So Small Items Stay Put
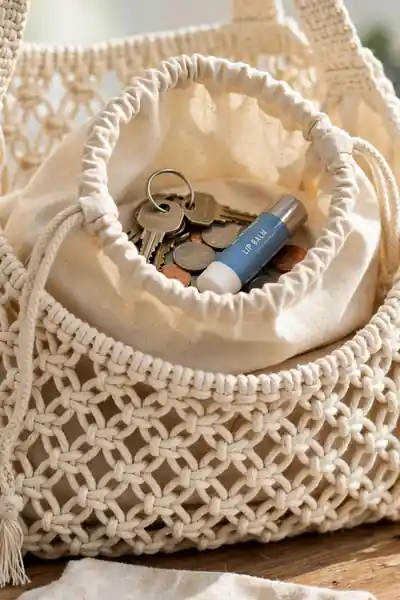
Quick Tip: Measure the pouch against the bag at rest, not stretched. A pouch about 12 by 10 inches sits neatly inside this tote, and a drawstring top matters more than fancy fabric, because the drawstring is what actually stops things hopping out at the stall.
A cotton produce bag you already own may fit perfectly, and a sewn pouch is only two rectangles stitched on three sides. Loop the drawstring once around a handle inside the tote and tie it off. The pouch then lifts out for washing and never leaves with the shopping.
Size and Stretch: What the Finished Bag Really Carries

Finished Size: About 14 inches wide by 15 inches tall, handles not counted | Stretch: The net gives roughly 2 extra inches in length under a full load | Carry Test: A gallon of milk, a bag of apples, two jars, and a loaf, all at once | Make Time: About 3 to 4 relaxed hours for a first bag
On its hook the tote looks modest, almost small. Load it and the net opens like a hammock around the shopping, hugging jars so they stop clinking against each other. Size up by adding cords in multiples of four, or size down by dropping two net rows, keeping the same method either way.
Mistakes That Make a First Tote Sag or Twist
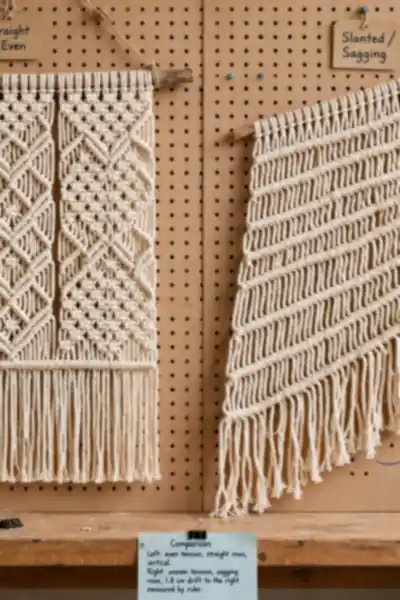
Common Mistake: The most common cause of a sagging tote is uneven pulling: some knots hauled tight, others left loose, row after row. The panel quietly takes on a slant, and by the base the two sides no longer match, so the bag twists on its handles forever.
The Fix: Pull every knot to the same firmness by counting the pull, two steady tugs and stop. Check the panel against a straight edge after each band of rows, and correct the very next row instead of hoping the slant works itself out later. It never does.
Cutting cords short to save money is the close second mistake. Twelve feet sounds generous until the base rows and the trim take their share, and a cord that ends mid row cannot be rescued neatly. Measure honestly, tape the ends, and the bag finishes the way it started.
Style It Three Ways for Market, Beach, and Everyday

Before: On its hook by the door, the finished tote is just a bag: cream cord, wooden rings, neat net. It carries well, but nothing about it yet says where it is going or who is carrying it.
Also Explore:DIY Macrame Keychain Tutorial for Thoughtful Gifts
After: At the market it wears the pouch inside and a crust of bread showing through the net. At the beach it swallows a rolled towel and a paperback, fringe down and rings up. In town it pairs with a sundress or jeans, the wooden rings reading as part of the outfit, not an afterthought.
One honest styling note: cream cord goes with everything, which is why this first bag uses it. Once the method feels easy, a second tote in a dyed or two tone cord becomes the statement piece, and the plain one stays the daily workhorse by the door.
Frequently Asked Questions
1. How long does this macrame tote bag tutorial take a complete beginner?
About 3 to 4 hours of relaxed knotting, usually spread over a weekend. The mounting and the top band take the most care; the net rows move quickly once the rhythm settles. A second bag often takes half the time.
2. Can I use a different cord, like 3 mm or a braided cord?
Yes, with small changes to expect. A 3 mm cord gives a slightly smaller, softer bag at the same counts, while braided cord stretches less and holds crisper diamonds. Cotton in 4 mm stays the friendliest first choice because it grips its own knots.
3. How do I wash the finished tote?
Hand wash it in cool water with a little mild soap, press the water out gently, and hang it by the rings to dry in shape. Avoid soaking the wooden rings for long; a quick wipe keeps them clean without swelling the wood.
4. My rows slant even though I pull evenly. What else can it be?
Recount the hanging ends on the panel: 32 is the number that keeps the pattern honest. A slanted panel often means one edge group quietly picked up an extra cord, or the panel hangs crooked from its hook. Comb the cords straight down before each new row.
5. Can I sell totes I make with this tutorial?
Yes. The bags your hands make are yours to sell at markets or online, and this sturdy market size is the version buyers reach for first. Price for your cord and your hours, not just the materials, so the work stays worth repeating.
Conclusion
You now own the whole build: rings that carry the load, a firm band, an even net, and a base that holds its line. I’ve seen how making this one change can completely shift the result. The change here is simple: measure honestly once, and the bag stops fighting you. Save this macrame tote bag tutorial to your craft board today, take the finished tote to the market this weekend, and share it with the friend whose plastic bags keep tearing. Your next bag will be faster, and it starts with the first one hanging by your door.