Indoor Plant Care for Beginners That Actually Works
Killing your first houseplant feels personal, but almost every beginner loses one. The good news: indoor plant care for beginners is mostly about a few simple habits, not a green thumb. Light, water, and drainage decide nearly everything.
This guide skips the confusing science and gives you exact steps instead. You will learn how to check soil before watering, read the light in your rooms, mix soil that drains, feed without burning roots, and fix the problems every new plant owner meets.
Whether you just brought home a pothos or you are eyeing a snake plant, follow along section by section. Your plants are about to get much happier.
Pick a Plant That Forgives Beginners

My first plant was a fern I bought because it looked pretty in the store. It lasted eleven days. That failure taught me the single most useful lesson in indoor plant care for beginners: the plant you start with matters more than anything you do afterward. Beginners do not need rare or dramatic plants. They need forgiving ones that survive a missed watering, a dim corner, and all the guesswork of the first month.
Start with one of these five. A pothos trails happily in low to medium light and tells you when it is thirsty by drooping slightly. A snake plant tolerates low light and wants water only every two to three weeks. A ZZ plant stores water in its rhizomes, so forgetting it for a month is fine. A spider plant bounces back from almost any mistake and even makes free baby plants. A heartleaf philodendron behaves like a pothos with softer leaves. All five cost under fifteen dollars at most garden centers, and all five survive the exact errors beginners make.
Buy just one plant first. Learn its rhythm for a month. Once you can keep one plant alive without thinking about it, adding a second feels easy instead of stressful.
Choosing a forgiving first plant is the closest thing to a cheat code in this hobby. It buys you time to learn watering and light while the plant quietly tolerates your mistakes. One forgiving plant and one month of attention will give you the confidence to grow a real collection.
Read Your Light Before You Buy Anything

Most plant tags say “bright indirect light” and most beginners have no idea what that means in their actual living room. Here is the myth: you need a sunny window for every plant. And here is the fact: most popular houseplants evolved under tree canopies, so they prefer bright shade over direct sun. A south-facing window with harsh afternoon rays can scorch a pothos faster than a dim hallway will starve it.
Learn your windows. East-facing windows give gentle morning sun for about three to four hours, which suits almost everything. South and west windows deliver strong afternoon light, often five or more hours, so keep plants a few feet back or behind a sheer curtain. North windows give soft, steady light all day with no direct sun, which is perfect for snake plants, ZZ plants, and ferns. Now do the hand test. Hold your hand a foot above the plant’s spot at midday. A sharp dark shadow means strong light. A soft blurry shadow means medium light. Barely any shadow means low light.
Match honestly. If your only spot is a north window, buy the snake plant and skip the cactus. If you have a bright east window, nearly any beginner plant will thrive there. Light is the one thing you cannot fix later with effort, so getting it right before you buy saves you from every problem that follows.
Getting your light right takes ten minutes and prevents months of yellow leaves and stalled growth. Stand in the spot, check the shadow, note the window direction, and buy the plant that fits the reality instead of the fantasy. Your future self, the one with thriving plants, will thank you for this one unglamorous step.
Also View:Start a Plant Flipping Side Hustle From Your Windowsill
The Finger Test: Watering Without Guessing

Overwatering kills more houseplants than every other beginner mistake combined, and it happens because people water on a schedule instead of checking the soil. Calendars do not know your humidity, your pot size, or your season. Your finger does. Push it into the soil up to the second knuckle, about two inches deep. If it feels cool and damp, walk away. If it feels dry and crumbly, it is watering time.
Adjust the depth to the plant. For succulents and snake plants, wait until the soil is dry all the way down, which can take two to three weeks. For tropicals like pothos, philodendron, and peace lilies, water when the top one to two inches dry out, usually every seven to ten days indoors. For ferns and calatheas, keep the top inch lightly moist and never let the whole pot go bone dry. Same finger, same test, different patience for each plant type.
When the soil says water, commit fully. Take the plant to the sink, pour slowly until water streams from the drainage holes, let it drain for ten minutes, then empty the saucer. That deep soak followed by real drainage is what roots want. Half-hearted sips that only wet the top inch train roots to stay shallow and weak.
The finger test turns watering from a guessing game into a two-second habit you will use for years. Check before you pour, soak deeply when dry, and let the soil set the schedule instead of the calendar. It is the simplest skill in this whole guide, and it prevents the number one killer of houseplants.
How Much Water Is Actually Enough
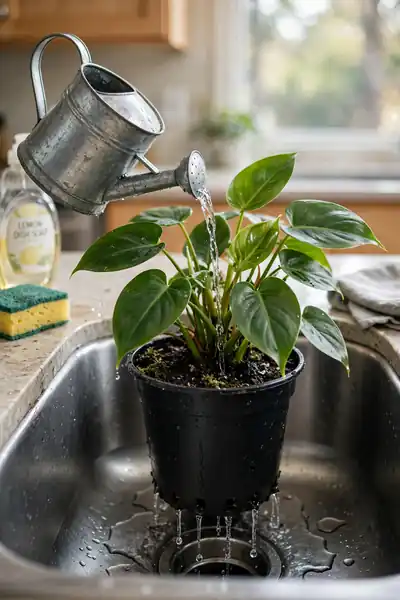
Before: a beginner dribbles half a cup of water onto the soil surface every few days, the top looks damp, and the roots at the bottom stay thirsty. After: the same beginner soaks the whole pot once, lets it drain completely, and the plant perks up within a day. The difference is not frequency. It is completeness. Roots need the entire root ball moistened, then a real dry-down period before the next drink.
Use pot size as your guide. A four-inch pot usually needs about one cup of water per soaking. A six-inch pot takes closer to two or three cups. An eight-inch pot can need a full quart. Pour slowly in a circle so the water absorbs instead of running down the inside edge of the pot. When water flows freely from the drainage holes, stop. Wait ten minutes, then tip out everything collected in the saucer. Standing water is how root rot starts, and a saucer full of old water undoes a perfect watering.
Two things never count as watering. Misting wets leaves for minutes and does nothing for roots. Ice cubes melt too slowly and too cold, shocking tropical roots. Both are popular on social media and both are useless. Real watering means soil, soaked through, drained fully.
Water deeply, drain completely, and check the soil before repeating, and you will have solved the problem that ends most beginner plant journeys. The amount matters less than the method. Soak the whole root ball, empty the saucer every single time, and let dryness, not the calendar, call the next watering.
Pots and Drainage: The Setup You Cannot Skip

Every dead plant story I hear starts the same way: a beautiful pot with no hole in the bottom. The pot is the foundation of everything, and beginners consistently pick pretty over practical. So here is the honest comparison. Terracotta breathes. Its porous walls wick moisture away from the soil, which means it forgives overwatering and suits beginners who love to fuss. The tradeoff is that soil dries faster, so you will water a bit more often in summer. Plastic and glazed ceramic hold moisture longer, which suits forgetful waterers, but they punish heavy-handed watering because the soil stays wet for days.
The real answer for beginners is simpler than the debate. Use a plain nursery pot with big drainage holes as the actual home, then slide it inside any pretty decorative pot you love. When it is watering time, lift the nursery pot out, water it in the sink, let it drain, and set it back. You get the look you want and the drainage roots need, with zero compromise.
Whatever outer pot you choose, the inner pot must have holes. No pebbles-in-the-bottom trick replaces a real drainage hole. Rocks just create a soggy layer where water sits and roots rot. Drill a hole, buy a pot that has one, or use the nursery-pot-inside trick. Everything else in plant care gets easier once water can actually leave.
Drainage is the least glamorous topic in this guide and the most important one you will read today. A ten-dollar plant in a five-dollar nursery pot will outlive a fifty-dollar plant in a sealed ceramic showpiece every time. Get the holes right first, and watering, soil, and feeding all start working the way they should.
Also Explore:21 Creepy-Cute Halloween Flower Pots for Your Porch
Soil Mixes That Drain the Way Roots Like
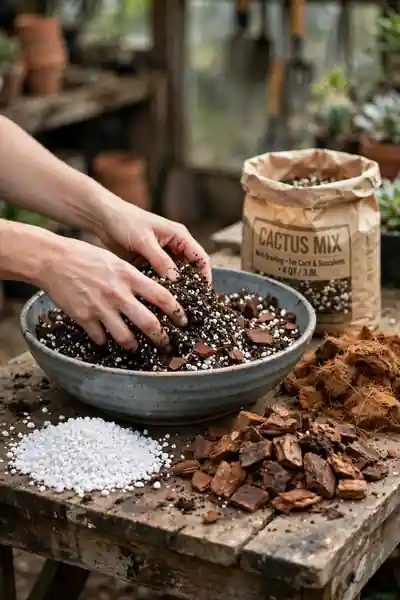
Think of potting mix as a recipe, not a product. Roots need three things from soil: moisture they can drink, air pockets they can breathe through, and structure that does not collapse into mud. Bagged “potting soil” alone usually fails the second one. It holds water like a sponge and suffocates roots within weeks. Mixing your own takes five minutes and changes everything.
For tropicals like pothos, philodendron, peace lily, and spider plant, use two parts standard potting mix, one part perlite, and one part orchid bark. The perlite keeps air pockets open, the bark creates chunky gaps for thick roots, and the base mix holds enough moisture. For succulents, snake plants, and ZZ plants, go grittier: two parts cactus or succulent mix, one part perlite, and one part coarse sand or pumice. This drains fast enough that a heavy watering never leaves roots sitting wet.
One hard rule: never use garden soil indoors. It compacts in pots, carries weed seeds and pests, and drains terribly in containers. It was made for the ground, not for a six-inch pot on your shelf. A ten-dollar bag of perlite plus a bag of decent potting mix will upgrade every plant you own for a year.
Good soil is invisible when it works, which is exactly why beginners skip it. Mix the chunky tropical blend for leafy plants and the gritty blend for succulents, and you will water with confidence instead of fear. Roots that can breathe grow fast, and fast-growing plants are the ones that make this hobby addictive.
Feeding Without Burning the Roots

“Should I be feeding this thing?” is the question every beginner asks around month three, usually while staring at a plant that stopped growing. The short answer is yes, but gently. Here is what those three numbers on the bottle mean. A label that reads 10-10-10 lists nitrogen, phosphorus, and potassium, always in that order. Nitrogen grows leaves, phosphorus supports roots and blooms, potassium keeps the whole plant sturdy. A balanced fertilizer like 10-10-10 or 20-20-20 covers everything a foliage houseplant needs.
Now the part that matters. Whatever the label says, mix it at half strength for houseplants. If the bottle says one teaspoon per gallon, use half a teaspoon per gallon. Indoor plants in pots cannot handle full-strength feeding the way garden plants can, and the number one fertilizer mistake is enthusiasm. Too much burns root tips, and burned roots show up as brown crispy leaf edges that look exactly like underwatering. Feed every two to four weeks from spring through early fall, when plants actively grow. Stop completely from late fall through winter, when most houseplants rest and cannot use the extra nutrients.
Always water the soil lightly before feeding, never pour fertilizer onto bone-dry roots. And skip the feeding entirely for the first month after repotting, since fresh mix already contains nutrients.
Feeding is simple once you respect the dose. Half strength, growing season only, moist soil first. Your plants will reward that restraint with deeper green leaves and steady new growth, which is the whole point of bringing them home. Start this spring and watch the difference one season makes.
Humidity: The Invisible Thing Your Plant Notices

Here is a mistake I made for two years: I bought humidity-loving plants, put them in my dry living room, and blamed myself when their leaf edges turned brown and crispy. The mistake was not my watering. It was the air. Most homes sit at 30 to 40 percent humidity in winter, thanks to heating. Most tropical houseplants want 40 to 60 percent. That gap is the entire reason calatheas, ferns, and peace lilies crisp up in January while snake plants and ZZ plants shrug it off.
You have three honest fixes, and they are not equal. Grouping plants together raises local humidity a few percent as they transpire, which helps but will not save a fern. A pebble tray, meaning a saucer of pebbles with water just below the tops, adds a little moisture right around the pot and works decently for one or two plants. A small cool-mist humidifier is the only fix that actually moves the needle for a whole shelf, and a basic one costs about twenty-five dollars. Run it near the plants, not across the room.
The bathroom trick is real but limited. A bright bathroom with a window gives ferns and calatheas the steam they crave after showers. A dark windowless bathroom just gives them low light plus humidity, which is a different problem. Match the plant to both conditions, not just one.
Stop fighting your home’s air and start working with it. Group the humidity lovers near a small humidifier, let snake plants and ZZ plants handle dry rooms, and watch the brown edges stop appearing. Your plants were never asking for much, just air that feels a little more like the tropics they came from.
The First Thirty Days With a New Plant
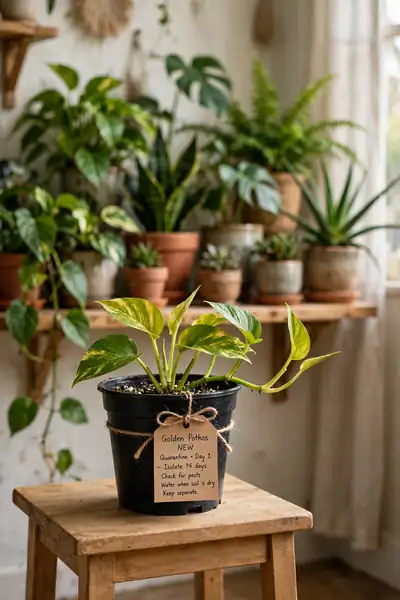
Bringing a plant home feels like the finish line, but the first month is really a quiet audition. The plant just survived a greenhouse, a truck, and a store shelf, so it arrives stressed even when it looks perfect. Give it thirty days of calm before you judge it, move it twice, or decide it hates you.
Week one is quarantine. Keep the newcomer a few feet from your other plants and check the leaves, top and bottom, every few days for hitchhiking pests. Two weeks of distance is enough to catch anything that came home in the soil. Week two is observation. Place it in the light you chose, water only when the finger test says so, and resist the urge to repot. Most new plants do not need a new pot yet, and repotting a stressed plant doubles the shock. Weeks three and four are settling in. You will see which leaves were already tired from the store and which new growth means the plant has accepted your home. Trim the sad ones. They are not coming back, and the plant wastes energy on them.
Skip fertilizer for the whole first month. The grower already fed it, and fresh enthusiasm plus fresh fertilizer is how roots get burned. Just light, careful water, and patience.
Thirty days of calm attention beats a year of anxious fussing. Quarantine first, watch more than you touch, and let the plant tell you it is home by pushing out one confident new leaf. That first new leaf is the real welcome party, and it only arrives when you give the plant room to breathe.
When and How to Repot, Step by Step
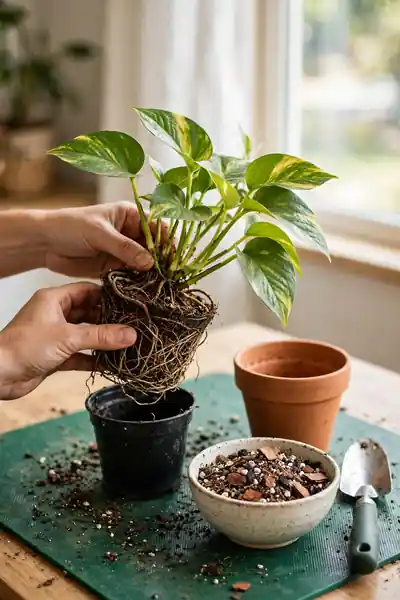
Repotting scares beginners because it looks like surgery, but it is closer to moving apartments. You know it is time when roots circle out of the drainage holes, water runs straight through without soaking in, or the plant gets top-heavy and tips over. If none of that is happening, leave it alone. Most houseplants are happy in the same pot for a year or two, and repotting on a schedule instead of on signs is a classic beginner error.
Choose a pot only one to two inches wider than the current one. A much bigger pot holds a swamp of wet soil around small roots, which invites rot. Water the plant a day before so the root ball holds together. Then slide the plant out, tease the circling roots gently with your fingers, and set it in the new pot at the same depth it sat before. Fill around it with fresh mix, press lightly to remove air pockets, and water deeply until it drains.
Expect a sulk. Many plants droop or drop a leaf or two in the week after repotting, and that is normal shock, not failure. Keep it in its usual light, skip fertilizer for a month, and water only when the top inch dries. Spring is the kindest season for the job, right as the plant wakes up to grow.
Done right, repotting is a gift, not a trauma. Fresh soil, a little more room, and a plant that rewards you with a growth spurt within weeks. Watch for the real signs, size up modestly, and handle the roots like you mean it, because you do.
Cleaning Leaves the Right Way

Dust is a slow thief. A thin gray film on leaves blocks the light the plant is trying to drink, and in a dry house that film builds up within a month. You will not notice it happening, but you will notice the plant looking dull and growing slower than it should. Wiping leaves is the cheapest growth booster in this hobby, and it takes about thirty seconds per plant.
Dampen a soft cloth with lukewarm water, support each leaf from underneath with your other hand, and wipe the top surface gently from stem to tip. That is the whole technique. For small-leafed plants like pothos, a lukewarm shower works better than wiping fifty leaves by hand. Just lay the pot on its side if the soil tends to wash out, or cover the soil with plastic wrap first. Do this every month or two, and always skip the leaf-shine sprays. They clog the tiny pores leaves breathe through, and the glossy look is not worth the damage.
While you wipe, look closely. Cleaning day is inspection day. Sticky residue, fine webbing, or tiny cottony clusters are early pest warnings you would never catch from across the room.
Clean leaves photosynthesize better, which is a scientific way of saying the plant can finally eat properly. A damp cloth, a monthly habit, and a quick look while you work will keep your plants greener and catch trouble weeks before it becomes a real problem.
Pests: Catch Them Before They Spread
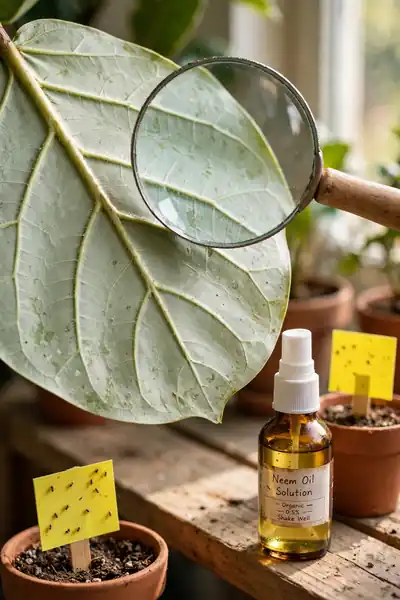
Every plant owner meets pests eventually, and beginners always assume it means they did something wrong. It does not. A few tiny invaders ride home from even the best garden centers, and the only real mistake is not looking. Check the undersides of leaves every week or two, because that is where all three usual suspects hide.
Fungus gnats are the tiny flies hovering around the soil. They mean the top of the soil stays too wet. Let the soil dry deeper between waterings and set out yellow sticky traps to catch the adults. Spider mites leave fine webbing and speckled, dusty-looking leaves, especially on palms and calatheas. Wipe every leaf, rinse the plant in the shower, and raise the humidity a little, since mites love dry air. Mealybugs look like tiny bits of white cotton tucked into leaf joints. Dab each one with a cotton swab dipped in rubbing alcohol and isolate the plant until you are sure they are gone.
Whatever you find, act the same day and quarantine the plant from the rest of your collection. Most infestations are easy when they are small and miserable when they are not. A weekly sixty-second leaf check is the entire prevention program.
Pests are a when, not an if, so treat inspections like brushing teeth: quick, regular, and non-negotiable. Catch them early, treat the same day, and keep the plant isolated until it is clean. Your collection will stay healthy because you looked, not because you were lucky.
Yellow Leaves? Diagnose It in One Minute

Yellow leaves panic beginners, but the leaf is actually giving you a diagnosis if you know how to read it. Start with the pattern. Lower leaves yellowing one or two at a time on an otherwise healthy plant usually means overwatering, especially if the soil feels damp and the yellow leaf is soft and mushy. The fix is simple: let the soil dry out properly and check that the pot drains. Whole-plant paleness with yellowing between the veins often points to low light or hunger, so move it brighter and consider whether it has been fed this season.
Now check the texture, because it separates the two most confused problems. Soft, limp yellow leaves mean too much water. Dry, crispy yellow or brown edges mean too little water or very dry air. A plant that is thirsty perks up within hours of a deep watering, which is the fastest confirmation you will ever get. If the yellow leaves are only the oldest ones at the base and new growth looks fine, that is natural aging, not a problem at all. Snip them off and move on.
Do not fertilize a stressed plant to fix yellow leaves. Feeding a plant that is drowning or parched just adds stress to stress. Fix water and light first, wait two weeks, and only then think about nutrients.
One yellow leaf is a message, not a tragedy. Read the pattern, feel the texture, fix water and light before anything else, and you will solve ninety percent of yellow-leaf mysteries in under a minute. The plant was trying to tell you exactly what it needed all along.
Root Rot Rescue That Gives Plants a Second Chance

Last spring I nearly threw away a peace lily. It had flopped over completely, the soil smelled faintly sour, and I was sure it was finished. On a whim I unpotted it instead, and the roots told the whole story: half were white and firm, half were brown and mushy. Two weeks after a proper rescue, it pushed out a new leaf. Root rot feels fatal, but it is only fatal if you ignore it.
Start with the smell and squeeze test. Slide the plant out of its pot and sniff the root ball. Healthy roots smell like fresh soil. Rotted roots smell sour or swampy. Squeeze a few. White or tan and firm means alive. Brown or black and mushy means dead. Rinse the whole root ball under lukewarm water so you can see clearly, then trim every mushy root with clean scissors, cutting back to firm healthy tissue. Be brave here. Leaving rot behind just lets it spread.
Repot into fresh dry mix in a clean pot with drainage, choosing a pot no bigger than the reduced root ball needs. Wait two or three days before the first light watering so the cut ends can callus. Then water sparingly for the next month while new roots grow.
Not every plant survives, and that is honest. But many do, and the ones that do come back stronger because you fixed the drainage or the watering habit that caused the rot. Unpot, trim bravely, repot fresh, and give it a month. Second chances are kind of the whole hobby.
Keep Pets Safe Around Your Plants

Here is the uncomfortable comparison every pet owner needs. On one side: pothos, philodendron, snake plant, ZZ plant, peace lily, and jade, all popular, all easy, and all toxic if a cat or dog decides to chew them. On the other side: spider plant, parlor palm, Boston fern, calathea, and prayer plant, all non-toxic and perfectly safe around curious mouths. The plants do not care which side you pick. Your vet bill does.
You do not have to give up the toxic ones. You have to place them like someone with a pet. High shelves, hanging planters, and closed rooms keep chewers away from temptation. A trailing pothos on a bookshelf is decor. The same pothos on a coffee table next to a bored kitten is an emergency vet visit. Know your animal too. A dog that ignores plants is a different situation from a cat that chews everything green out of principle.
If chewing happens anyway, stay calm and act fast. Remove any plant bits from the mouth, note exactly which plant it was, and call your vet or a pet poison hotline right away. A photo of the plant helps them identify it fast. Do not wait for symptoms to decide.
Pet-safe plant parenting is just placement plus knowledge. Learn which of your plants are toxic, put those up high or behind closed doors, and fill the reachable spots with the safe list. Everyone in the house stays happy, including the ones with fur. Two lists, smart placement, zero vet visits.
Mistakes That Quietly Kill Beginner Plants

Seven mistakes, seven fixes, learned the hard way so you do not have to. First, watering on a schedule instead of checking soil. Fix it with the finger test from section three. Second, buying a plant your light cannot support. Fix it by matching the plant to your window before you pay. Third, the sealed pretty pot with no drainage. Fix it with a nursery pot inside the decorative one. Fourth, repotting into a giant pot “so it has room to grow.” Fix it with the one-to-two-inch rule. Fifth, feeding a struggling plant to perk it up. Fix it by solving water and light first. Sixth, ignoring the undersides of leaves for months. Fix it with a weekly sixty-second check. Seventh, keeping a clearly failing plant out of guilt instead of changing something. Fix it by moving it, repotting it, or admitting the spot was wrong.
Notice the pattern. Almost every killer mistake comes from guessing instead of checking, or from doing nothing while hoping. Plants are not mysterious. They respond to light, water, soil, and attention in completely predictable ways once you learn the signals.
Here is the encouraging truth underneath all seven. Every experienced plant person killed plants learning these exact lessons. The difference between a beginner and an expert is not talent. It is a short list of mistakes you only need to make once, and now you have the list before the funeral.
Frequently Asked Questions
1. How often should a beginner water indoor plants?
There is no fixed schedule. Check the top 1 to 2 inches of soil with your finger and water only when it feels dry, then water deeply until it drains out the bottom.
2. What is the easiest indoor plant for a total beginner?
A pothos or snake plant. Both tolerate low light and missed waterings, and they show clear signs when they need help.
3. Why are my plant’s leaf tips turning brown?
Usually dry air or inconsistent watering. Raise humidity, water evenly, and trim the brown tips with clean scissors.
4. When should I start fertilizing a new plant?
Wait about a month after bringing it home, then feed at half the label strength once a month through spring and summer only.
5. My plant droops right after repotting. Is it dying?
Probably just transplant shock. Keep it in gentle light, water normally, and give it a week or two to settle.
6. Do indoor plants need less care in winter?
Yes. Growth slows, so water less often, stop fertilizing, and move plants away from cold windows and heating vents.
Conclusion
Your windowsill needs no perfect gardener. It needs light you have checked, water only when the soil asks for it, and a pot that lets the extra drain away. That is the heart of indoor plant care for beginners, and it is well within your reach. Pick one forgiving plant, follow the first thirty day rhythm, and watch how calm plant care feels. Save this post on Pinterest so the rescue fixes are ready when a leaf turns yellow, and share it with a struggling plant friend. I’ve seen how small changes like these can completely shift the way a space feels, and a green corner does exactly that.