
21 Creepy-Cute Halloween Flower Pots for Your Porch
Your porch is the first thing trick-or-treaters see, and these spooky pots are the fastest way I know to make it look festive. I used to stare at my plain steps every October, wishing they looked like the cute porches on Pinterest. A two-dollar terracotta pot and some craft paint changed everything.
In my experience, the hardest part isn’t the painting; it’s deciding which design to try first. That’s why I put together 21 ideas here, from five-minute candy corn stripes to glowing luminaries. Each one is beginner-friendly and costs just a few dollars.
By the end of this guide, you’ll have a porch that makes neighbors slow down and smile. Pick two or three favorites, gather your supplies this weekend, and let’s make something worth showing off.
Candy Corn Striped Pot

If you can paint three straight stripes, you can make this pot. Start with a clean terracotta pot and paint it white. Once it dries, wrap painter’s tape around the middle section, then paint the top orange and the bottom yellow. Peel the tape while the paint is still tacky.
In my experience, the tape line is where most people go wrong. Press the edges down firmly with your fingernail, or paint will sneak underneath. A hair dryer on low speeds up drying between coats. Finish with a clear sealant spray so October rain doesn’t ruin your work.
Mummy-Wrapped Pot
Also View:DIY Halloween Wreath That Looks So Store Bought Chic

This one is perfect if painting faces makes you nervous. There is zero painting involved, just wrapping, and the googly eyes do all the character work. Kids absolutely love this project, and it takes about fifteen minutes from start to finish.
- Brush a thin layer of craft glue or Mod Podge over the outside of a clean pot.
- Wrap white gauze or torn fabric strips around the pot, overlapping as you go. Leave a small gap near the top front for the eyes.
- Glue two large googly eyes into the gap, then tuck a small succulent or faux plant inside. Done.
- Lightly mist the gauze with watered-down brown paint if you want an aged, ancient-mummy look.
Spiderweb Pot

Quick Tip: Draw your web with a white paint pen instead of a brush. You’ll get cleaner lines with way less frustration. Start with straight spokes from the rim, then connect them with curved lines.
Paint the pot matte black and let it dry fully, or the white web will smear. The web doesn’t need to be perfect; wobbly lines look more like a real web. Hang a plastic spider from the rim with clear thread, and plant something orange inside. Marigolds are cheap and very October.
Friendly Bat Pot

Common Mistake: Most people paint their bats too small and too high on the pot. From the street, tiny bats near the rim just disappear, and the whole design reads as a plain purple pot.
The Fix: Paint three or four big bats across the middle of the pot instead. Vary their sizes and tilt their wings at different angles. Big, bold shapes read clearly from ten feet away, which is exactly where your porch visitors stand.
Use a deep purple base so the black bats pop. A bat stencil or a thin brush both work fine. I’ve noticed most people skip sealant here, but porch pots take a beating in October weather. Two light coats of clear spray keep the bats crisp all month.
Vampire Fang Pot
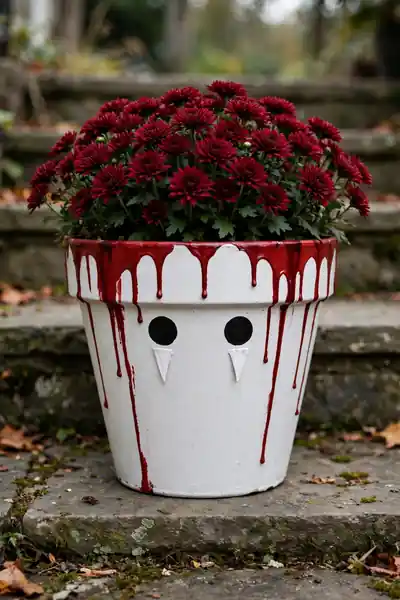
What You Need:
- White acrylic craft paint: covers the terracotta in two coats for a clean vampire-pale base.
- Red acrylic paint: thinned slightly with water so it drips naturally from the rim.
- Black paint pen: draws the sharp eyes and mouth details without brush streaks.
- Small flat brush: lays down smooth, even base coats quickly.
- Clear sealant spray: protects the drips from smearing in damp weather.
Paint the pot white first and let it dry fully. Then load red paint on your brush and touch it to the rim, letting gravity pull the drips down naturally. Don’t overthink the fangs; two simple white triangles under the eyes read instantly as vampire. This one always makes visitors smile.
Skeleton Face Pot

Before: A plain black pot on your porch looks unfinished, like you ran out of ideas halfway through decorating. Visitors walk past it without a second glance, and it does nothing for your Halloween theme.
After: Add a white skull face and suddenly it’s the pot everyone asks about. The pampas grass on top looks like wild hair, and the whole thing reads as intentional, spooky decor instead of an empty black pot.
Keep the skull simple: two round eyes, a triangle nose, and a stitched mouth. White paint pens give the cleanest lines on a black base. The pampas grass is the secret weapon here; it adds height and drama for almost no money. Swap it for dried wheat if pampas is hard to find.
Owl Pot

Do This:
- Paint the whole pot warm brown first so the feather details have a rich background.
- Make the eyes huge; oversized eyes are what make owls read as cute instead of creepy.
- Add small triangle ear tufts with a bit of clay or thick paint for dimension.
- Plant something grassy or feathery on top to mimic the owl’s head tuft.
Avoid This:
- Don’t use tiny eyes; small eyes make the owl look angry instead of adorable.
- Don’t skip the sealant, because porch moisture will dull your feather details fast.
- Don’t overcrowd the design; leave breathing room between the feather strokes.
Owls are a Halloween classic that never feels overdone. The trick is keeping the color palette warm: browns, golds, and creams always look richer than gray on a porch. This pot takes about an hour plus drying time. Set it near your door where the big eyes greet every visitor.
Monster Eye Pot

Time Needed: 30 minutes plus drying | Difficulty: Very easy | Cost: Under $5 | Best For: Kids’ craft afternoon
This is the pot I hand to kids every year. There is no wrong way to do it: the sillier the eyes, the better. Mix painted eyes with glued-on googly ones for texture. A bright green or purple base makes it pop from the street. It dries fast, perfect for last-minute decorating.
Tombstone Pot
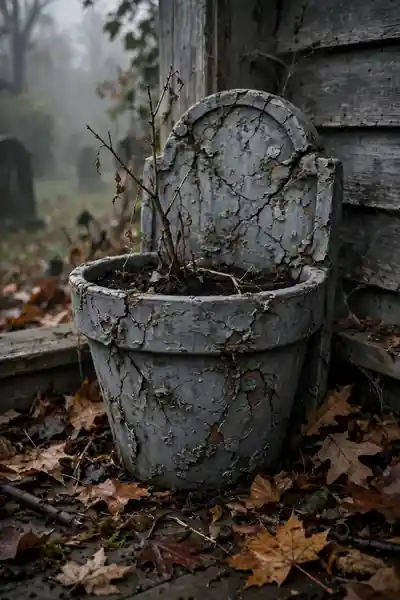
Gray paint transforms an ordinary pot into a miniature tombstone in minutes. Paint the whole pot a stony gray, then add darker shading along the edges with a dry brush. Write RIP or a funny epitaph like ‘Barry M. Deep’ across the front with a black paint pen.
Roughen the top edge with sandpaper after the paint dries for an aged, weathered look. Plant something dead-looking on purpose: a bare twig or dried grass reads as perfectly spooky here. Cluster two or three tombstone pots together in a porch corner with scattered leaves for a mini graveyard.
Haunted House Scene Pot
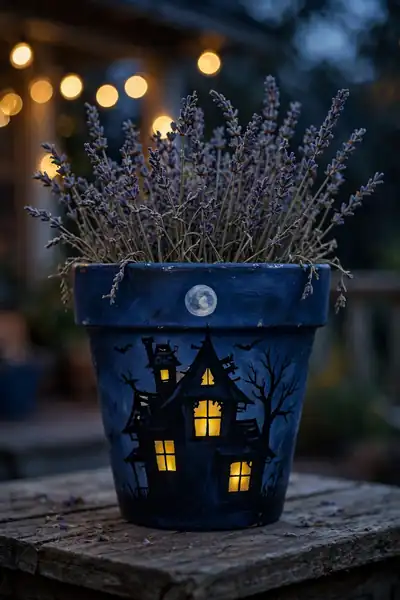
Of all the halloween flower pots on this list, this one gets the most compliments at my house. A full scene wrapped around the pot looks impressive, but it’s really just three simple shapes: a house, windows, and a moon. Anyone can paint this.
- Paint the pot deep navy or black and let it dry completely. This dark sky background makes everything else pop.
- Paint a simple black house silhouette: a square with a triangle roof and a tall chimney. Keep the edges rough; spooky houses shouldn’t look neat.
- Dot small yellow rectangles for glowing windows, then add a pale circle for the moon in the upper corner.
- Plant something wispy like dried lavender or fountain grass so it looks like fog around the house.
Black Cat Silhouette Pot

Quick Tip: Cut the ears from black craft foam instead of painting them. They glue on in seconds and give real dimension that paint alone can’t match. Two triangles and you’re done.
Paint the pot orange first for that classic Halloween contrast. Then paint or glue the cat silhouette so it wraps around the pot like it’s slinking past. The pipe-cleaner tail curling off the side is what sells it. Tuck a green mum inside and you’ve got the cutest guard cat on the block.
Spider Planter

Common Mistake: Most people glue the legs on straight, and the spider ends up looking like a black starfish. Straight legs also snap off the first time someone bumps the pot.
The Fix: Bend each pipe cleaner into a zigzag with a clear knee joint before gluing. Angle four legs forward and four backward, like a real spider’s stance. The bent shape is stronger and instantly reads as spider.
Use a hot glue gun for the legs; craft glue won’t hold pipe cleaners on a curved pot. A spiky succulent like a haworthia makes the perfect spider body on top. Set this one where kids will find it at eye level. It’s the pot that gets picked up and giggled over the most.
Witch’s Brew Cauldron Planter

What You Need:
- Black acrylic paint: turns any pot into a cast-iron cauldron look in two coats.
- Expanding craft foam or green tissue: creates the bubbling brew spilling over the rim.
- Small purple and green plants: coleus or ornamental cabbage look like potion ingredients.
- Wooden dowel or stick: pokes into the foam as a stir stick.
- Battery fairy lights: tuck green-tinted ones into the foam for a glowing brew effect.
Paint the pot black and add three small clay feet so it sits like a real cauldron. The foam does the heavy lifting; once it puffs up and you paint it green, it looks like a bubbling brew. This is the pot guests photograph most. Keep it near your door for maximum effect.
Potion Bottle Pot

Before: A plain purple pot with a dead plant looks like you gave up on gardening, not like Halloween decor. It sits there doing nothing for your porch theme, and nobody gives it a second look.
After: Add an apothecary label and some twisted twigs, and suddenly it’s a potion ingredient straight from a witch’s shelf. The little corked bottle tied on with twine is the detail that makes people lean in for a closer look.
Print the label on kraft paper for an authentic feel. Words like ‘Witch’s Brew’ or ‘Eye of Newt’ work beautifully. Tie the tiny bottle on with natural twine, not ribbon; the rustic texture sells the look. Group two or three potion pots together for a full shelf display.
Stacked Pumpkin Topiary
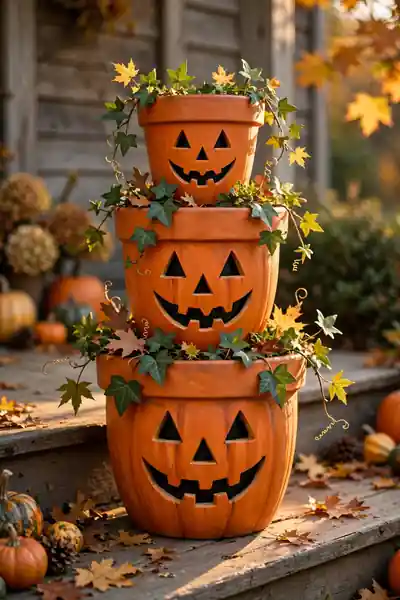
Do This:
- Choose three pots in graduating sizes so the tower looks balanced, not wobbly.
- Paint each pot orange and let it dry fully before stacking; wet paint will stick layers together.
- Thread a wooden dowel through the drainage holes to lock the stack in place.
- Tuck faux vine leaves between the layers to hide the seams.
Avoid This:
- Don’t skip the dowel; a stacked tower without support topples in the first strong wind.
- Don’t paint fiddly detailed faces; bold simple faces read better from the street.
- Don’t use real soil between layers; it adds weight and makes the tower unstable.
This topiary gives you the most impact per dollar on the whole list. Three cheap pots become a three-foot statement piece that anchors your entire porch. I’ve seen this make a real difference on bare porches; it fills vertical space nothing else does. Build it once and reuse it every October.
Light-Up Jack-o’-Lantern Pot
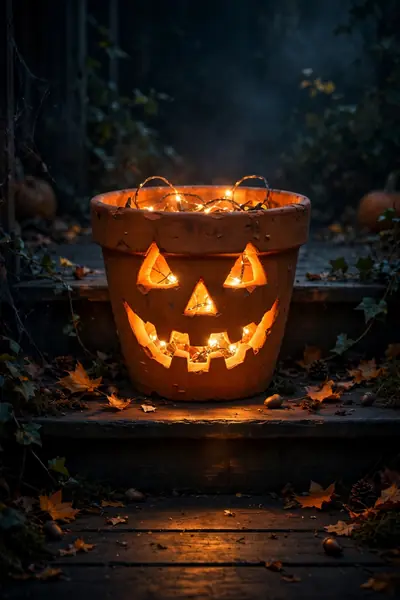
Time Needed: 1 hour plus drying | Difficulty: Medium | Cost: Around $8 | Best For: Porch steps at night
Real carved pumpkins rot in a week; this pot glows all month. Paint it orange, then cut simple face shapes from black adhesive vinyl instead of cutting the pot itself. Drop a string of warm fairy lights inside and let them spill over the rim. From the street, nobody can tell it isn’t real.
Ghostly Draped Cheesecloth Pot
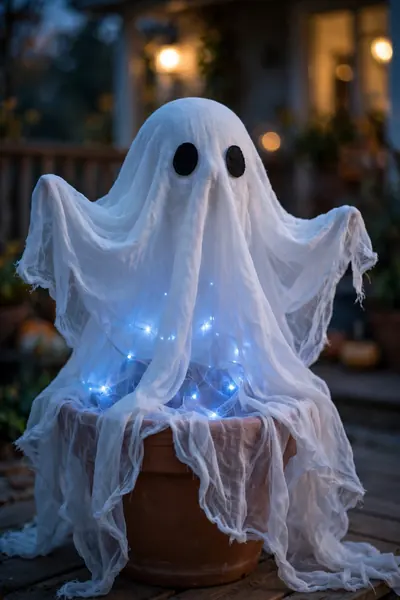
Drape white cheesecloth over an upside-down pot and you get an instant floating ghost. Stiffen the fabric first by dipping it in watered-down craft glue, then shape it over the pot while it’s damp. The glue dries clear and holds those spooky flowing folds in place.
Stick two black felt eyes on once it’s dry. Tuck white fairy lights under the cloth so the ghost glows from within at night. Hang it from a porch hook or set it on a tall stand. It sways gently in the breeze, which makes it extra eerie.
Eerie Glowing Eyes Pot

Also Explore:22 Eerie Halloween Outdoor Decorations That Dazzle
If you want halloween flower pots with real scare factor, this is the one. Tucked inside a dark bush by your steps, all anyone sees is glowing eyes staring back at them. It costs almost nothing, takes about twenty minutes, and works every single year.
- Paint a small pot matte black and glue pairs of googly eyes around the outside. Use yellow, red, and green for variety.
- Push a short string of battery fairy lights into the pot so light spills out around the eyes.
- Nestle the pot deep inside a bush or tall planter by your front steps where it’s mostly hidden.
- Turn the lights on at dusk. From the sidewalk, visitors see only floating glowing eyes in the dark.
Candy Holder Witch Hat Pot

Quick Tip: Make the witch hat from black cardstock, not fabric. Cardstock holds its cone shape without any stiffening, and you can size it to your pot in under five minutes. A paper buckle glued on the front finishes it.
Fill the pot with individually wrapped candy so little hands can grab easily. The hat sits right on top like a lid, which keeps the candy visible but tidy. Set this station by your front door on Halloween night. It doubles as decor all month and a candy bowl on the big night.
Autumn Harvest Scarecrow Pot

Common Mistake: Most people glue the straw hair on flat against the pot, and it ends up looking like a bad toupee. Flat straw also sheds everywhere the first time the wind picks up.
The Fix: Bundle the raffia into small bunches and glue them pointing outward and upward, like real hair sticking out from under a hat. Add a tiny straw hat on top if you like. The outward angle looks natural and sheds far less.
Paint the face friendly, not scary: big stitched smile, round rosy cheeks, triangle nose. Scarecrows work best in harvest color palettes, so stick to oranges, yellows, and browns. Dried sunflowers or wheat stalks in the pot complete the look. This one bridges Halloween and Thanksgiving beautifully.
Day of the Dead Sugar Skull Pot

What You Need:
- White acrylic paint: gives you the clean sugar-skull base that makes colors pop.
- Fine paint pens in pink, blue, orange, and black: draw the detailed floral patterns without brush fuss.
- Small round brush: fills in petals and larger color areas smoothly.
- Clear gloss sealant: makes the colors shine like a real glazed sugar skull.
- Marigolds: the traditional Day of the Dead flower, and the colors match perfectly.
Start with the eyes: big flower shapes with layered petals in bright colors. Add a heart nose and stitched smile, then fill gaps with dots and tiny flowers. Don’t aim for symmetry; real sugar skulls are folk art, and imperfection is the charm. This pot honors a beautiful tradition and looks stunning on any porch.
That’s all 21! Start with two or three favorites rather than trying to make them all; a small cluster of pots makes a bigger impact than a scattered dozen. Seal everything if your porch gets rain, and store your favorites wrapped in newspaper so they’re ready next October. Happy decorating, and happy Halloween!
Conclusion
You now have 21 ways to turn plain pots into the cutest halloween flower pots on the block. Start with just two or three; a small cluster by your door beats a scattered dozen every time. I’ve seen how making this one change can completely shift the result: a bare porch becomes the house kids remember.





One Comment