DIY Air Dry Clay Bookmarks That Readers Will Treasure
Every reader has a drawer of dead bookmarks: faded receipts, bent cards, a ribbon that lost its fight months ago. The ones that survive are never bought in a shop. They are diy air dry clay bookmarks, made by someone who knows exactly how that reader reads.
This guide walks you through both shapes, the corner pocket and the hanging strip, with the thickness rule that keeps them alive, seven designs worth copying, names that survive sealing, and the packaging that turns a small clay strip into a kept gift.
In my experience, your second bookmark is the one you start being proud of.
Why Readers Keep These Bookmarks for Years

A paper receipt fades, a ribbon frays, but a clay bookmark with your name pressed into it gets kept. Readers tuck them into favorite novels, lend them only to people they trust, and feel a small pang when one is left inside a returned library book.
The secret is not talent, it is fit. A bookmark that sits flat, carries a design with a reason behind it, and feels smooth against the page becomes part of the reading habit itself. Make it right once, and it marks pages for years.
What You Need: Basic Supplies and Nice Extras

Nothing on this list is exotic, and most of it is probably in your kitchen or craft drawer already. The basics make the bookmark; the extras only make it prettier. Gather everything before the clay comes out, because clay waits for no one.
- Start with the clay itself: one pack of white air dry clay makes eight to ten bookmarks, so a single pack is plenty for a first session.
- Add the shaping basics: a rolling pin, two wooden sticks or rulers of equal height as rolling guides, a craft knife, and a cutting mat.
- Keep water nearby in a small dish or spray bottle: a fingertip of it smooths edges and seals small cracks while you work.
- Lay out the finishing basics: fine sandpaper, acrylic paints, small brushes, and a clear brush on sealer in matte or gloss.
- Treat the extras as optional: letter stamps, lace or leaf textures, ribbon and tassels, and metallic paint for the designs later in this article.
Also View: 21 Enchanting Cozy Reading Nook Ideas for Book Lovers
The Thickness Rule: Four to Five Millimeters

Quick Tip: Roll between two guide sticks of the same height and your slab cannot cheat. Freehand rolling always leaves one end thinner, and that thin end is where bookmarks snap in bags and books.
Thinner than four millimeters feels elegant for a week and then breaks at the first tight hardcover. Thicker than five turns clumsy and can strain a paperback spine. In my experience, the four to five window is where bookmarks survive real reading lives every day.
Step One: Condition the Clay Until It Bends Without Cracking

Common Mistake: Most people cut cold clay straight from the pack and start rolling. Clay that has not been warmed and worked is stiff, and it answers every bend with a crack along the edge.
The Fix: Knead for two to three minutes until the ball folds over itself without splitting. Cold rooms need an extra minute; your warm hands are the tool here, not water.
Test the bend before you roll: fold a small piece in half and look at the crease. A smooth crease means the clay is ready. A cracked one means another minute of work and kneading saves you a cracked bookmark an hour from now later.
Step Two: Roll an Even Slab

What You Need:
- Two guide sticks of equal height: they set the slab thickness so your hands cannot drift.
- A smooth rolling pin: textured pins print their pattern into the clay whether you want it or not.
- A craft mat or parchment sheet: keeps the slab from sticking and tearing at lift off.
- A light touch at the edges: rolling only the middle keeps the ends from thinning out.
Roll from the center outward, turn the slab once, and roll again. Two directions of travel even out the small ridges one direction always leaves behind. When the pin rides on both guide sticks at once, the slab is telling you it is truly ready.
Step Three: Cut the Corner Shape

Before: A freehand corner shape comes out lopsided nine times out of ten. One side sits deeper on the page than the other, and the bookmark slides off the corner it was made to hug.
After: A paper template gives you the same true shape every single time. The pocket grips the page corner evenly, stays put through a whole chapter, and looks deliberate instead of improvised.
Here is the small tip for the point: round it by a hair. A needle sharp clay point chips in the first week of use in bags and books, while a point softened by half a millimeter survives years of page corners without losing its crisp look.
Step Four: Smooth Every Edge While It Is Soft
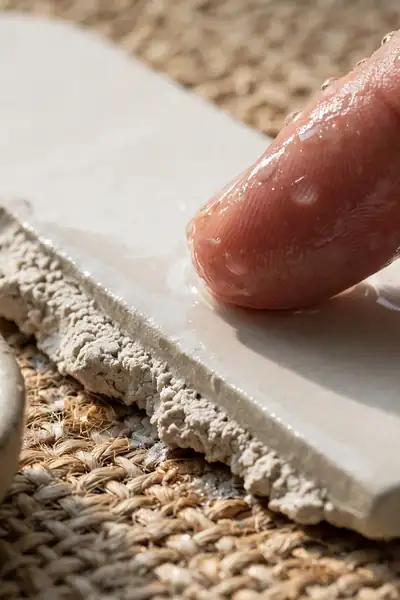
Do This:
- Dip one fingertip in water and run it along every cut edge until the roughness disappears.
- Work the corners a second time, since they dry fastest and crack first.
- Check the back edges too, not just the pretty front.
Avoid This:
- Do not soak the piece; a wet surface turns to slip and smears your shape.
- Do not skip the edges and plan to sand everything later; dry sanding rounds your design away.
- Do not press hard, or the edge thins below the safe thickness.
Two quiet minutes here decide whether the finished bookmark feels handmade in the good way or the rough way. Pages forgive a sealed, smoothed edge completely. They catch, tear, and complain about a raw one every single time you turn them in bed.
Step Five: Add Texture Before It Dries

Time Needed: 5 minutes while the clay is soft | Difficulty: Easy | Best For: Lace, leaves, stamps, and fabric weave | Pro Tip: Test the print on a scrap piece first
Press once, firmly, and lift straight up. Rocking the lace or stamp smears the print into a shadow of itself, and soft clay gives you no second try on the same spot. A test press on scrap clay costs nothing and teaches your hands pressure.
Step Six: Dry It Flat and Turn It Once

Flat pieces dry honestly only when air reaches both faces. Lay the bookmark on parchment over a rack, away from sun and heaters, and give it a full day for a thin piece, two days for a thick one, before you even think about touching it for a check.
At the halfway point, turn it once, gently, and let the second face take its turn. My check is simple: a dry bookmark feels room temperature and truly light, while a damp one still feels cool against the cheek and suspiciously heavy.
Step Seven: Sand the Dry Bookmark Smooth

Drying hardens clay, but it does not finish it. The surface that comes off the rack is matte, slightly rough, and quick to grab at paper. Ten patient minutes with fine sandpaper turn that roughness into the smooth slide readers feel.
- Wait until the piece is fully dry by the cheek test from the last section; sanding damp clay gums the paper and tears the surface.
- Work with fine grit, around 400, in small circles, and let the paper do the work without pressing.
- Sand the edges and the back as carefully as the front, since all three touch paper.
- Brush the dust away and run a fingertip over the whole piece; your finger finds rough spots your eyes forgive.
Step Eight: Paint It in Thin Layers

Quick Tip: Two thin coats always beat one thick coat. A thick layer dries on top while staying soft below, then cracks and peels the first time the bookmark bends inside a book.
Let each coat dry fully before the next, about twenty minutes for acrylic at this size. Thin layers keep the surface flexible, the texture visible, and the colors honest. Rush this step and every later step, sealing included, quietly inherits the problem in the end.
Names and Initials That Survive the Sealer

Common Mistake: Most people paint the name on last, over the sealer, because it feels safer to add it at the end. Paint sitting on top of a sealed surface has nothing to grip, and letters flake off one by one in the book.
The Fix: Put the name in before sealing, always. Stamp or carve the letters while the clay is soft, or paint them onto the sanded, unsealed surface, then let the sealer lock them under its clear coat.
For a stamped name, press each letter once, straight down, at even depth. Rocking a stamp doubles the letter into a blur. A name that survives sealing becomes the reason this bookmark is the one nobody is allowed to ever borrow from the shelf again.
Step Nine: Seal Both Sides, Always

What You Need:
- A brush on clear sealer in matte or gloss: matte hides flaws, gloss deepens colors, both protect.
- Parchment under the piece: dried sealer glues bookmarks to bare tables with real commitment.
- Two thin coats per side: one coat always misses the edges it claims to cover.
- An hour of drying between coats: patience here is the whole difference between smooth and tacky.
Seal the front, the back, and the edges, in that order, and let the piece rest overnight before its first book. A bookmark sealed on one side quietly drinks slow moisture through the other and steady warps toward the dry face within one short season.
The Hanging Bookmark: Roll, Cut, and Punch the Hole
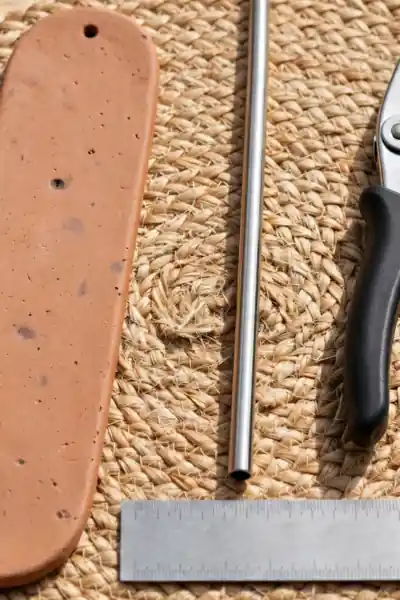
Before: The corner shape is lovely, but some readers want a marker that hangs out of the book and shows itself. A plain strip without a hole is just a clay ruler with ambitions.
After: The same slab, cut long with a rounded end and one clean hole, becomes a hanging bookmark. The ribbon will do the showing, and the clay stays slim enough to live between pages.
Punch the hole while the clay is soft, at least half an inch below the top edge, using a straw or a punch. A hole cut after drying cracks the rim, and a hole near the edge tears out under its own ribbon’s first tug.
Dry, Paint, and Seal the Hanging Shape

Do This:
- Dry this shape flat exactly like the corner one, turning it once at the halfway point.
- Keep paint and sealer out of the hole with a toothpick while each coat is wet.
- Sand the hole rim gently so the ribbon never saws against a rough edge.
Avoid This:
- Do not hang it to dry by its hole; wet clay stretches and the hole turns oval.
- Do not seal the rim shut and plan to force the ribbon through later.
- Do not rush the second side; a tacky back marks the page it touches.
The rhythm is identical to the corner bookmark, and that is the kindness of this project: learn one finishing path and every shape obeys it. Take the extra minute on its own hole, because the quiet ribbon will test it daily for years of reading.
Add the Ribbon or Tassel

Time Needed: 5 minutes | Difficulty: Easy | Best For: Satin ribbon, cotton cord, or a handmade tassel | Result: A bookmark that shows itself on the shelf
Thread the ribbon through, loop it back on itself, and knot it where the loop sits flat quietly against the clay. A tassel wants the same flat lie. Anything bulky turns the bookmark into a wedge that strains the spine it rests in.
Keep Them From Cracking: Water, Warmth, and Patience

Nearly every crack is born at the making, not the drying. Too much water worked into the clay swells it unevenly, and the piece pays for that water later as it leaves. Keep additions to a damp fingertip and the clay stays honest.
Warmth is the second trap: a radiator or a sunny sill dries the skin of the piece while the core stays wet, and the two pull apart. Dry slowly in still air instead. If a hairline opens, smooth a whisper of slip into it while it is small.
What to Do When a Bookmark Warps
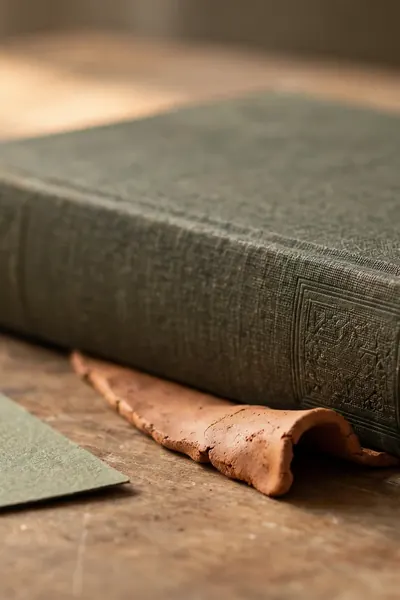
A curled bookmark is not a ruined one. Clay warps when one face dries faster than the other, and gentle, even pressure over time can talk it back to flat without cracking the piece you worked so carefully to finish.
- Wait until the bookmark is fully dry; pressing a damp piece only bends it into a new wrong shape.
- Lay it on a flat surface, cover it with parchment, and set a heavy book on top.
- Leave it for two to three days, checking once a day without lifting the weight for long.
- For a stubborn curl, breathe barely warm air over it for a minute before weighting, never hot and never close.
Making a Whole Batch at Once
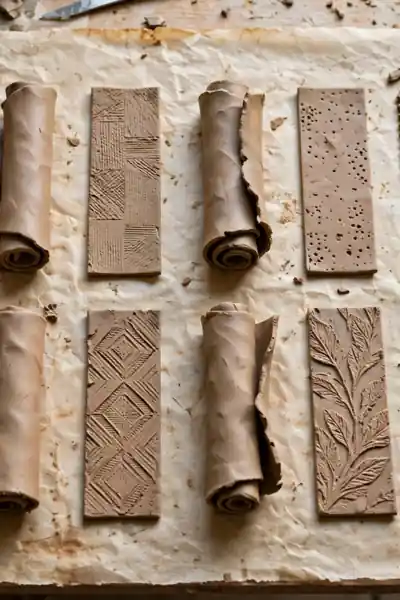
Quick Tip: Work in stages, not one bookmark at a time. Roll and cut every shape first, smooth all the edges in one pass, and let the whole sheet dry together. Stage work is how ten bookmarks take barely longer than three.
A batch also forgives beginners: if one piece cracks, nine remain, and the lesson arrives without the heartbreak. Teachers and book clubs love this rhythm, since every reader at the table ends the week with the same own small treasure in their hand at last.
Turn Them Into Gifts: Packaging That Looks Store Bought

Before: A loose bookmark handed over bare reads as a leftover, however pretty it is. The receiver smiles, pockets it, and the work you did disappears into a coat within the hour.
After: The same bookmark on a card, inside a sleeve, with one handwritten line, reads as a chosen gift. People keep the card, display the pair, and remember exactly who made it and why.
Write the line about the reader, not the craft: their favorite book, their year, their name in your hand. Packaging takes four minutes and costs pennies, yet it is the step that turns a clay strip into a treasure someone keeps for years on a shelf.
Also Explore: 22 Personal Air Dry Clay Gift Ideas From the Heart
Seven Designs Worth Copying First

What You Need:
- Minimalist neutral: one coat of cream or clay toned paint, no design at all, for the quiet reader.
- Pressed botanical: a real leaf or flower pressed into soft clay, then sealed over for a garden in miniature.
- Personalized name: stamped letters filled with gold, the design readers ask for by name.
- Floral painted: small freehand blooms on a pale ground, forgiving because petals hide wobbles.
- Terrazzo: tiny chips of colored clay pressed into the slab before rolling, speckled like stone.
- Scalloped and tassel: a wavy cut edge for softness, or a plain shape lifted by its ribbon.
Start with the design that matches the reader, not the one that matches your mood. The name version is the most saved and shared of all diy air dry clay bookmarks for one plain reason: nobody throws away a thing with their name on it.
Making These With Kids

Before: Hand a child the full process and the sharp knife, the thin rolling, and the long drying all become battles. The session ends in tears, clay on the sleeve, and no bookmark anyone wants to keep.
After: Split the jobs by hand size and patience. Children condition, roll with guides, press textures, and paint; adults cut, punch holes, and seal. Everyone owns a step, and the finished piece is honestly theirs.
Keep sessions to one shape per child and let the design be entirely theirs, however wild the colors run. A grandmother bookmark in purple and orange, made by small hands, will outlast every careful adult piece in this article in pure love and daily use.
Leftover Clay? That Is Your Next Bookmark

Do This:
- Roll every leftover scrap into one last slab before you wash your hands.
- Cut minis and corner shapes from pieces too small for a full length bookmark.
- Store true scraps in an airtight box with a damp paper towel for the next session.
Avoid This:
- Do not knead dried crusty edges back into fresh clay; they seed the whole piece with cracks.
- Do not leave the pack open while you admire your work; clay dries from the moment it breathes.
- Do not promise a full bookmark from a walnut of clay and roll it paper thin to get there.
Bookmarks ask for so little clay that almost no session should end with waste. I’ve noticed that most people keep their very first bookmark, and it is usually the leftover one, made loose and happy at the end of the long table that day long ago.
How Long They Last, and the Water Question

Lifespan: Years of daily use when sealed both sides | Water Resistance: Splash safe, never soak safe | Biggest Enemy: Being bent in a stuffed bag | Pro Tip: Re seal once a year if it lives in a bathroom
Air dry clay is not waterproof, and no sealer makes it so; what sealing buys is safety from damp hands and humid shelves. Treat the bookmark like the book it serves, dry and flat, and it will outlast by far the first novel beside it.
What a Bookmark Costs, and What Sellers Charge
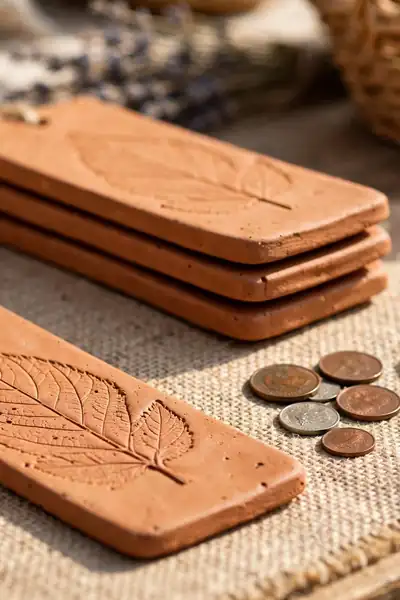
Count the clay honestly: a standard pack costing about six dollars makes eight to ten bookmarks, so each one carries well under a dollar at most of clay. Paint and sealer add pennies, since a bookmark drinks almost nothing from either bottle in a whole session.
Handmade sellers charge at markets four to eight dollars for pieces like these, and personalized name bookmarks sit at the top of that range. Whether you sell or gift, the gap between cost and worth is the whole quiet joy of making them yourself.
Mistakes That Ruin an Otherwise Good Bookmark
Eight mistakes account for nearly every ruined bookmark, and I have made all eight myself. None of them needs talent to avoid, only timing. Read the list once and your second batch will skip the failures your first one taught you.
- Too thin or too large. Paper thin pieces snap, and oversized ones strain spines; hold the four to five millimeter rule and a modest length.
- Skipping the edge smoothing, or handling the piece too soon. Raw edges tear pages, and a soft bookmark moved early bends into its warp.
- Painting before the clay is fully dry, or laying paint on heavy. Trapped moisture and thick coats crack and peel together.
- Sealing only one side. The open face drinks moisture and the bookmark curls toward the sealed one within weeks.
- Punching the ribbon hole too close to the edge. Leave half an inch of clay above the hole or the first tug tears it out.
My Best Tips After Many Batches

Quick Tip: Make two of everything. Clay work forgives a learner who has a spare; the first piece teaches, the second one shines, and the pair costs you ten extra minutes at most.
Keep one plain test bookmark from every batch and write the date on its back. In a year that small archive shows your hands exactly how far they have come, and it settles every argument ever about whether a new trick really worked or not.
How to Store Finished Bookmarks

Common Mistake: Most people toss finished bookmarks into a drawer or a bag together, where they rub, chip each other’s paint, and bend under whatever lands on top. A season of that undoing costs more than the making did.
The Fix: Store them flat, dry, and separated by tissue or felt, in a shallow drawer or a box that closes. One layer is best; two layers with a sheet between them is the honest limit.
Gift bound bookmarks can wait in their sleeves for months without harm, which is why December makers start in October. Keep the box at home away from steamy bathrooms, since even sealed clay prefers the same dry calm of rest that books do themselves too.
Frequently Asked Questions
1. Can I make a clay bookmark without a rolling pin?
Yes. A smooth bottle or a straight sided glass rolls a small slab well; the guide sticks matter more than the pin.
2. Can I use polymer clay instead?
Yes, and it bakes stronger and thinner, but it needs an oven and loses the soft, papery feel readers love about air dry clay.
3. Can I use a clay bookmark in a paperback book?
Yes, at four to five millimeters with smoothed, sealed edges. Skip very thick or heavy designs, which can strain a soft spine.
4. Can I write on a finished bookmark?
On a matte sealed surface, a fine permanent pen writes cleanly. Test on the back first, since gloss sealer can make ink bead.
5. Can I make these ahead of time?
Happily. Sealed bookmarks store flat for months, which is why gift makers batch them in autumn for December giving.
6. Why did my bookmark crack?
Almost always thickness, water, or rushed drying: one thin spot, too much water worked in, or heat that dried the skin first.
Conclusion
You can now make a bookmark that outlives the book it marks. These diy air dry clay bookmarks ask for one pack of clay, one quiet afternoon, and the patience to dry, sand, and seal them properly, and they repay it for years.
I’ve seen how making this one change can completely shift the result: a throwaway craft becomes a kept thing. Save this guide on Pinterest before your next clay session, make the first pair this weekend, and share it with the reader in your life who still folds page corners. Their next book deserves better.